
Introduction: Learning How to Draw a Basketball in a Simple Way
Drawing a basketball is one of the easiest and most effective beginner art exercises. A basketball has a simple geometric structure, mainly a perfect circle combined with curved lines that create its signature panel design. Because of this simple structure, it is widely used in schools and art classes to teach basic sketching skills. Even beginners with no experience in drawing can create a realistic basketball by following a proper step-by-step method.
The purpose of this guide is to help you understand how to draw a basketball in a clean, structured, and realistic way. You will also learn important drawing concepts like symmetry, shape balance, curved line control, and basic shading techniques. These skills are not only useful for drawing sports objects but also for improving overall artistic ability.
Step 1: Start by Drawing a Perfect Circle (Basketball Outline)
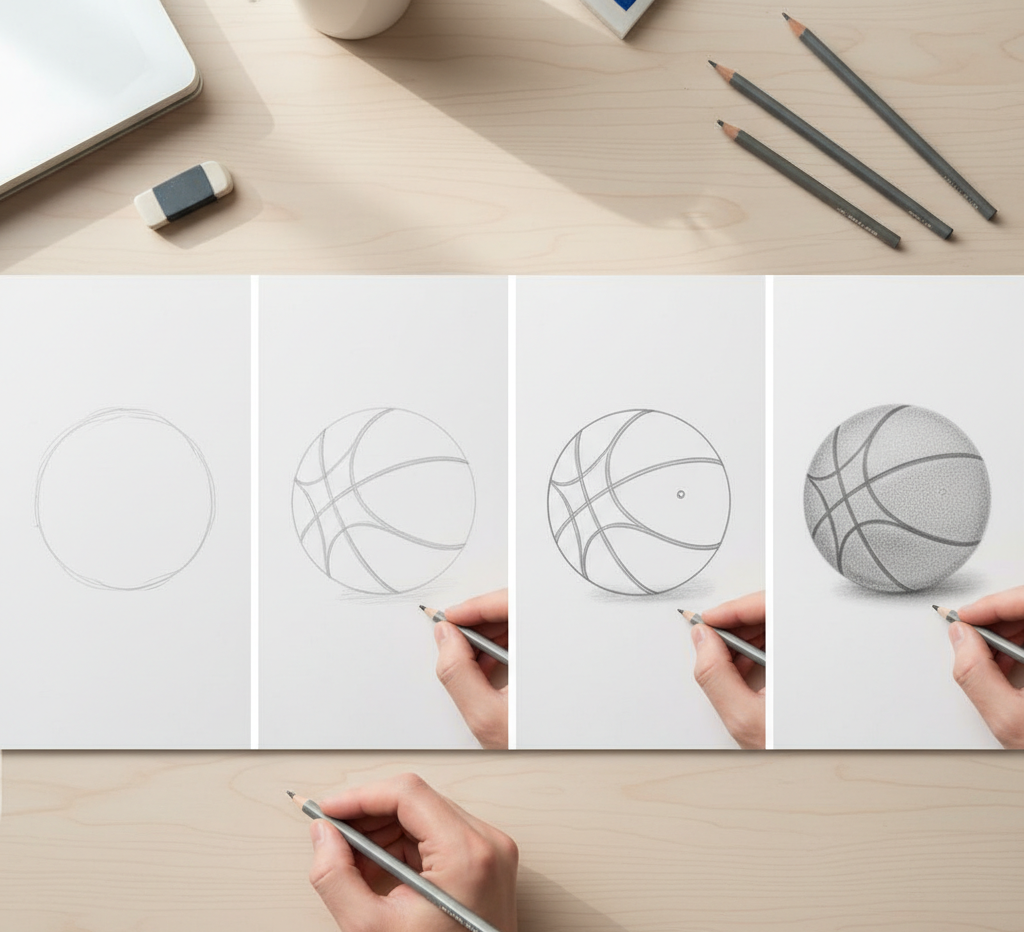
The first and most important step in drawing a basketball is creating a perfect circle. The circle represents the outer shape of the ball and forms the foundation of the entire drawing. A basketball is completely round in real life, so maintaining accuracy in this step is very important for a realistic result.
Beginners can draw the circle freehand, but using a compass or tracing a round object like a cup or plate can help achieve better accuracy. The circle should be smooth, balanced, and evenly shaped from all sides. Light pencil strokes are recommended so that corrections can be made easily if needed.
This step is often called the basketball outline drawing phase in art tutorials because it defines the basic structure of the object before adding details.
Step 2: Draw the Vertical Curved Line for Structure
Once the circle is complete, the next step is to draw a vertical curved line from the top to the bottom of the circle. This line is not completely straight because a basketball has a 3D rounded surface, and curves help represent that shape realistically.
This vertical line divides the basketball into left and right halves. It also forms part of the iconic basketball panel design that is seen in all standard basketballs. While drawing this line, make sure it gently follows the round shape of the circle instead of cutting straight through it.
This step is important in basketball sketching tutorials because it adds depth and structure to the drawing.
Step 3: Add the Horizontal Curved Line Across the Middle
After drawing the vertical line, the next step is to add a horizontal curved line across the middle of the circle. This line should also be slightly curved to match the round shape of the basketball.
When combined with the vertical line, it creates a cross-like structure inside the circle. This is the basic framework of a basketball’s surface design. These intersecting lines help define the panel layout that gives the basketball its recognizable appearance.
This step is commonly included in easy sports drawing guides because it teaches symmetry and proportional design.
Step 4: Draw Side Curved Panel Lines for Realistic Design
Now you need to add two additional curved lines on each side of the basketball. These lines should connect smoothly with the central cross lines and follow the round shape of the circle.
These curved lines divide the basketball into its signature panels. A real basketball has a segmented surface design, and these lines help replicate that structure in your drawing. It is important to maintain equal spacing and smooth curves so the design looks balanced and natural.
This step is essential in basketball outline drawing because it transforms a simple circle into a realistic sports object.
Step 5: Refine the Drawing and Clean the Structure
Once all the lines are added, the next step is refining the drawing. This involves darkening the main lines, cleaning up rough sketches, and erasing unnecessary marks. Refining helps improve the overall clarity and appearance of the basketball drawing.
At this stage, you should ensure that all curved lines are smooth and properly aligned. Any uneven or shaky lines should be corrected to maintain symmetry. A clean outline makes the drawing look more professional and realistic.
This step is important in step-by-step ball drawing guides because it prepares the sketch for final detailing and coloring.
Step 6: Add Color to the Basketball (Optional but Recommended)
A real basketball is typically orange in color with black curved lines. Once your outline is complete, you can add color to make the drawing look more realistic and visually appealing.
Use orange color for the main body of the basketball. Then darken the curved panel lines using black or dark brown. This contrast helps highlight the structure and gives the basketball its iconic appearance.
You can also use shading techniques to create a 3D effect. Adding light shading on one side of the ball makes it look more realistic and gives it depth. This is a commonly used technique in easy basketball sketch tutorials.
Step 7: Add Shading and 3D Effects for Realism
Shading is an optional but very powerful step that enhances the overall quality of your drawing. By adding light and dark areas, you can make the basketball look three-dimensional instead of flat.
To do this, decide where your light source is coming from. Shade the opposite side slightly darker while keeping one side lighter. This creates a natural spherical effect. You can also lightly shade the edges of the panels to give more depth.
This technique is widely used in advanced sports drawing tutorials and helps improve artistic skills significantly.
Tips for Drawing a Perfect Basketball
To improve your basketball drawing skills, follow these useful tips:
- Always start with light pencil strokes before darkening lines
- Keep your circle smooth and symmetrical
- Make sure curved lines follow the shape of the ball
- Avoid rushing the drawing process
- Practice regularly to improve hand control
These tips are commonly recommended in beginner art tutorials and help improve accuracy and confidence in drawing.
Importance of Learning Basketball Drawing for Beginners
Learning how to draw a basketball is not just about creating a sports sketch; it is also a great way to improve basic drawing skills. It teaches important concepts such as symmetry, proportion, and curved line control.
This exercise is especially useful for students and beginners who are learning sketching for the first time. It helps develop hand-eye coordination and improves creativity. Many art teachers use simple objects like basketballs in beginner drawing classes because they are easy to understand and practice.
From an SEO and educational perspective, topics like basketball drawing tutorial, easy sports sketching, and step-by-step drawing guide are widely searched by students online.
Common Mistakes to Avoid While Drawing a Basketball
Beginners often make some common mistakes while drawing a basketball. One of the most common errors is drawing a crooked or uneven circle, which affects the entire structure. Another mistake is making straight lines instead of curved ones, which makes the basketball look flat.
Some learners also add too many unnecessary details, which makes the drawing messy. It is important to keep the design simple and clean. Proper spacing between panel lines is also important to maintain balance and symmetry.
Avoiding these mistakes will help you create a more realistic and professional-looking basketball drawing.
Conclusion: Easy Method to Draw a Basketball Step-by-Step
Drawing a basketball is a simple and enjoyable process when broken into easy steps. Starting with a perfect circle, adding curved panel lines, refining the structure, and finally applying color and shading can transform a basic sketch into a realistic sports drawing.
This step-by-step basketball drawing guide is perfect for beginners, students, and anyone interested in learning basic sketching skills. With regular practice, you can improve your artistic ability and create more detailed drawings in the future.